
If you are new to Rails, you may want to read Rails Tutorial: Getting Started with Ruby on Rails and Rails: Generate Model vs. Resource vs. Scaffold before moving forward with authentication.
Devise is powerful, but can be fairly complicated and there are few step by step tutorials online that walk you through the user MVC. This tutorial attempts to streamline this process.
If you have any questions, please refer to the devise documentation on GitHub. The code for this tutorial (extracted from an actual application), has been pushed to GitHub as well, so you can follow along as it’s discussed.
Install Devise
After creating your Rails app, add gem ‘devise’ to your Gemfile, run bundle install in your command line, then execute rails g devise:install in your command line.
Create Devise User Model
Next, you’ll want to create your user model with devise, similar to the way you would create a user model otherwise. Run rails g devise user in your command line. This will create a user migration as well as the user model, which you can configure the same way you would any other model. If you didn’t enter any user-specific attributes (i.e., age:integer) when creating your user model, you can add those to your migration file prior to migrating.
After running rails g devise user, you should see a user.rb model in your models directory:
class User < ActiveRecord::Base
  # Include default devise modules. Others available are:
  # :confirmable, :lockable, :timeoutable and :omniauthable
  devise :database_authenticatable, :registerable,
         :recoverable, :rememberable, :trackable, :validatable
end
Once this is set up, you can add your relationships the same way you normally would:
class User < ActiveRecord::Base
  # Include default devise modules. Others available are:
  # :confirmable, :lockable, :timeoutable and :omniauthable
  devise :database_authenticatable, :registerable,
         :recoverable, :rememberable, :trackable, :validatable

  has_one :business
  has_many :reviews
  has_many :photos

end
You should also see a timestamped devise_create_users.rb migration in your db/migrate directory:
class DeviseCreateUsers < ActiveRecord::Migration
  def change
    create_table(:users) do |t|
      ## Database authenticatable
      t.string :email,              null: false, default: ""
      t.string :encrypted_password, null: false, default: ""

      ## Recoverable
      t.string   :reset_password_token
      t.datetime :reset_password_sent_at

      ## Rememberable
      t.datetime :remember_created_at

      ## Trackable
      t.integer  :sign_in_count, default: 0, null: false
      t.datetime :current_sign_in_at
      t.datetime :last_sign_in_at
      t.string   :current_sign_in_ip
      t.string   :last_sign_in_ip

      ## Confirmable
      # t.string   :confirmation_token
      # t.datetime :confirmed_at
      # t.datetime :confirmation_sent_at
      # t.string   :unconfirmed_email # Only if using reconfirmable

      ## Lockable
      # t.integer  :failed_attempts, default: 0, null: false # Only if lock strategy is :failed_attempts
      # t.string   :unlock_token # Only if unlock strategy is :email or :both
      # t.datetime :locked_at

      t.timestamps
    end

    add_index :users, :email,                unique: true
    add_index :users, :reset_password_token, unique: true
    # add_index :users, :confirmation_token,   unique: true
    # add_index :users, :unlock_token,         unique: true
  end
end
You can add attributes to this file prior to migrating if you prefer. Lastly, there should be a devise_for :users route in your routes.rb file.
Migrate
Once you have all of your other MVCs set up, you are ready to migrate by running rake db:migrate.
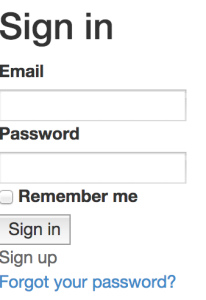
Once you migrate, devise will create the Sign Up and Login routes and views for you. If you go to http://localhost:3000/users/sign_up, you should see:

If you go to http://localhost:3000/users/sign_in, you should see:
 Note: if you get an error following migration, restart your Rails server.
Create Links
You are free to set up your links however is best for your application. Adding this code to your nav or landing page will create links to the Sign Up and Login pages shown above:
<% if user_signed_in? %>
  Logged in as <strong><%= current_user.email %></strong>.
  <%= link_to 'Edit profile', edit_user_registration_path, :class => 'navbar-link' %> |
  <%= link_to "Logout", destroy_user_session_path, method: :delete, :class => 'navbar-link'  %>
<% else %>
  <%= link_to "Sign up", new_user_registration_path, :class => 'navbar-link'  %> |
  <%= link_to "Login", new_user_session_path, :class => 'navbar-link'  %>
<% end %>
You should now see the following links:
Devise Mailer
To configure devise mailer, open config/environments/development.rb and enter the following code:
config.action_mailer.default_url_options = { host: 'localhost', port: 3000 }
Routes
If you’ve been working with Rails and never worked with devise, it may seem confusing to see that devise has set up some user routes and corresponding user views, even though you don’t see those views in your views directory. For example, if you log in, you will see a link to edit your profile, which will take you to the /users/edit route, allowing you to edit your devise settings, such as your password, or cancel your account. If you rake routes, you’ll see several routes dedicated to users:
        new_user_session GET    /users/sign_in(.:format)                       devise/sessions#new
            user_session POST   /users/sign_in(.:format)                       devise/sessions#create
    destroy_user_session DELETE /users/sign_out(.:format)                      devise/sessions#destroy
           user_password POST   /users/password(.:format)                      devise/passwords#create
       new_user_password GET    /users/password/new(.:format)                  devise/passwords#new
      edit_user_password GET    /users/password/edit(.:format)                 devise/passwords#edit
                         PATCH  /users/password(.:format)                      devise/passwords#update
                         PUT    /users/password(.:format)                      devise/passwords#update
cancel_user_registration GET    /users/cancel(.:format)                        devise/registrations#cancel
       user_registration POST   /users(.:format)                               devise/registrations#create
   new_user_registration GET    /users/sign_up(.:format)                       devise/registrations#new
  edit_user_registration GET    /users/edit(.:format)                          devise/registrations#edit
                         PATCH  /users(.:format)                               devise/registrations#update
                         PUT    /users(.:format)                               devise/registrations#update
                         DELETE /users(.:format)                               devise/registrations#destroy
In addition to the routes created by devise, there seems to have been an automagical creation of a sessions controller, a registrations controller and a password controller, despite not seeing these controllers in your controllers directory.
Users Controller
If you want to create a users controller and corresponding user views the way you would with a scaffold, run rails g controller users in your command line. This will create a users_controller.rb in your controllers directory, and will allow you to set up additional routes for your user model. Since devise handles create and other aspects of users, you don’t want to create routes for these things. However, you may want to create routes for index, edit, update and show:
class UsersController < ApplicationController

  before_action :set_user, only: [:show, :edit, :update] # probably want to keep using this

  # GET /users
  # GET /users.json
  def index
    @users = User.all
  end

  # # GET /users/1
  # # GET /users/1.json
  def show

  end

  # GET /users/1/edit
  def edit

  end

  # # PATCH/PUT /users/1
  # # PATCH/PUT /users/1.json
  def update
    respond_to do |format|
      if @user.update(user_params)
        format.html { redirect_to @user, notice: 'User was successfully updated.' }
        format.json { render :show, status: :ok, location: @user }
      else
        format.html { render :edit }
        format.json { render json: @user.errors, status: :unprocessable_entity }
      end
    end
  end

  private
    # Use callbacks to share common setup or constraints between actions.
    def set_user
      @user = User.find(params[:id])
    end

    # Never trust parameters from the scary internet, only allow the white list through.
    def user_params
      params.require(:user).permit(:role, :user_name)
    end

end
Don’t forget to add whatever routes you create to routes.rb, as follows:
resources :users, only: [:index, :show, :edit, :update]
User Views
To set up the rest of your views, run rails g devise:views in your command line. This will set up several views in your views/devise directory.
You will also want to run rails g devise:views users to create devise views for your users. This will create a series of directories in your views/users directory. Included in these views are the Sign Up and Login views pictured above. You can now customize those views.
Now that you have a dedicated user controller, you can set up corresponding views as you normally would in your views/users directory – index.html.erb, edit.html.erb and show.html.erb. In connection with your edit view, you probably want to create a partial for the edit form the way a scaffold would. – _form.html.erb.
You can now create a link to your user’s profile – <%= link_to “Profile”, current_user %> – which may contain a link to edit the user’s attributes – <%= link_to “Settings”, edit_user_path(@user) %>. Note that this will allow the user to edit any attributes you set (i.e., name, age, etc.). This is separate from the user’s devise settings which control password reset and account cancellation.
Sessions with Devise
If you have worked with OmniAuth and created a login through Facebook, Twitter or Github, you’ll know that you have to create your user sessions. This means adding the appropriate functions to your application model, user model, etc. However, devise handles sessions for you.
With that said, you still have to manage your routes and determine what information is accessible to which users. For example, you’ll probably want set up your redirects so only the logged in user can access the link (and URL) to edit that user’s profile. This will be specific to your application and its purpose (i.e., some applications allow users to view other users’ profiles, whereas other applications do not allow this).
Sessions Helper Methods
Devise is packaged with several helper methods for use throughout your application to control user accessibility:
To redirect non-logged in user from a page: before_action :authenticate_user!
To verify if a user is signed in: user_signed_in?
To verify current user: current_user
You will want to use these functions to control what each user can access.
Admin
Devise also allows you to create an admin using the same process through which you created a user MVC. Please refer to the devise documentation on GitHub for more information.
Using OmniAuth with Devise
It is also possible to set up a login with OmniAuth. You can follow the directions in the devise documentation on GitHub, or one of several other online tutorials.
Conclusion
If you have any questions as you are reviewing this tutorial, you can follow along with the repo I created on GitHub.
Please feel free to contact me with any questions or comments.
- PM Career Story - April 28, 2022
- How to Transition into Product Management - December 26, 2017
- What I’ve Learned in My First Few Months as a Product Manager - October 14, 2015

I’ve been searching for some sort of tutorial coaching me how to use devise the CORRECT way for the longest time and couldn’t be happier to have found your article. Thank you!!
Happy to help! If you’re working with devise, you may find this useful as well: http://www.korenlc.com/rails-devise-redirects-and-how-to-customize-devise/ 🙂
Hey Koren, very helpful article! I see just one typo:
before_action: authenticate_user! should be before_action :authenticate_user!
(move colon)
Good stuff!
Great catch – just updated. Thanks!
Hi,
i have been searching how to route the signout and where exactly to add that functionality.
Hey Koren thanks i likedt his article it fills in a few holes in the devise documentation………..was wondering where the users controller was and the views were too.
do you have any idea how to handle Roles and authorisation with devise?
e.g. I want user.manager to be able to view only the clients the manager is assigned to.