
Rails is a web application framework written in Ruby, also known as an MVC, or Model View Controller. Rails has two major philosophies: (1) DRY (“Don’t Repeat Yourself”) and (2) Convention Over Configuration, meaning Rails has a right and wrong way of doing things, and if you follow the Rails way, you shouldn’t have to configure every aspect your web application yourself.
Generating a Rails Application
Assuming you have set up your Rails environment, generating a new Rails app is easy. To generate a new Rails application, type rails new name-of-project into your command line. Once this is complete, opening the project directory in your text editor will reveal the complete Rails framework, which contains the directories in which your models, views and controllers will live. Reviewing the Rails documentation will help you understand the role of each directory.
Most Rails developers use Rspec to test their programs. To forego setting up the default test suite, enter -T at the end of the above command. To use Rspec, add the Rspec gem to the Gemfile. After you have added Rspec and any other new gems, run bundle at the command line. You are now ready to build your Rails application.
Models
Say you want to build a blog platform that includes posts and comments – you would need a Post model and a Comment model. Before generating models, it’s important to think through what attributes your models need. Your Post model likely needs a title and content, and your Comment model needs content and will be attached to a post. Therefore, your commands would be the following:
rails g model Post title:string content:text

rails g model Comment content:text post_id:integer
A model is typically singular and its attributes are written as follows: attribute:type where type is either string, text, integer, date or a variety of other types which are detailed in the Rails documentation.
ActiveRecord, or the Rails database, will automatically generate a primary key for each model. However, you must manually include a foreign key (post_id:integer ) if a foreign key is necessary, such as when one model belongs_to another. Once complete, your terminal should look something like this:
[14:49:11] rails-blog-project
♥ rails g model Post title:string content:text
      invoke  active_record
      create    db/migrate/20140713184933_create_posts.rb
      create    app/models/post.rb
      invoke    test_unit
      create      test/models/post_test.rb
      create      test/fixtures/posts.yml
[14:49:34] rails-blog-project
♥ rails g model Comment content:string post_id:integer
      invoke  active_record
      create    db/migrate/20140713184957_create_comments.rb
      create    app/models/comment.rb
      invoke    test_unit
      create      test/models/comment_test.rb
      create      test/fixtures/comments.yml
If you go to your directories, you will see that two model files have been added to your models folder: post.rb and comment.rb. Each folder contains an empty class which inherits from ActiveRecord::Base:
class Post < ActiveRecord::Base
end
Creating these models also added migration files to your db/migrate directory – create_posts and create_comments with timestamps. These files contain the ActiveRecord migrations for posts and comments, which basically means they set up the database tables for each model:
class CreatePosts < ActiveRecord::Migration
  def change
    create_table :posts do |t|
      t.string :title
      t.text :content

      t.timestamps
    end
  end
end
class CreateComments < ActiveRecord::Migration
  def change
    create_table :comments do |t|
      t.string :content
      t.integer :post_id

      t.timestamps
    end
  end
end
As you can see, each migration sets up a table containing the attributes set forth in your models. ActiveRecord automatically adds a timestamp.
ActiveRecord associations and validations must then be added to the models (to learn more, see the Rails ActiveRecord Associations documentation). For example, you want to let your program know that a post can have many comments, while a comment should belong to a single post. You also probably want to make sure that before a post is generated, it contains a title, and that a comment contains content. Once this is complete, your models should look something like this:
class Post < ActiveRecord::Base
  has_many :comments
  validates :title, presence: true
end
class Comment < ActiveRecord::Base
  belongs_to :post
  validates :content, presence: true
end
There are many types of validations, which can be reviewed in the Rails ActiveRecord Validations documentation.
Although your tables are laid out in your migration files, the tables are not generated until the migrations are actually run. To do this, enter rake db:migrate in your command line. Your command line should output something like this:
[16:08:54] rails-blog-project
♥ rake db:migrate
== 20140713184933 CreatePosts: migrating ======================================
-- create_table(:posts)
   -> 0.0023s
== 20140713184933 CreatePosts: migrated (0.0025s) =============================

== 20140713184957 CreateComments: migrating ===================================
-- create_table(:comments)
   -> 0.0013s
== 20140713184957 CreateComments: migrated (0.0014s) ==========================
Migrating will also generate a schema.rb file containing the schema for your application:
ActiveRecord::Schema.define(version: 20140713184957) do

  create_table "comments", force: true do |t|
    t.string   "content"
    t.integer  "post_id"
    t.datetime "created_at"
    t.datetime "updated_at"
  end

  create_table "posts", force: true do |t|
    t.string   "title"
    t.text     "content"
    t.datetime "created_at"
    t.datetime "updated_at"
  end

end
To learn more, review the Rails ActiveRecord Migrations documentation.
Now, if you enter rails s in your command line and open localhost:3000 in your browser, you should see your Rails application with a message letting you know you’re riding Ruby on Rails!
Controllers
An ApplicationController is automatically generated with any Rails application. You can find this in the controllers directory:
class ApplicationController < ActionController::Base
  # Prevent CSRF attacks by raising an exception.
  # For APIs, you may want to use :null_session instead.
  protect_from_forgery with: :exception
end
The purpose of a controller is to receive specific requests and to collect information related to the application. The router (discussed below) determines which controller receives which requests and through what action. Each action’s purpose is to collect information to provide to a view (also discussed below). Controllers can be thought of as the middleman between models and views.
For this project, you will need a PostsController and a CommentsController, so you want to enter rails g controller Posts and rails g controller Comments in your command line. Unlike models, controllers are generally plural. Your terminal should look something like this:
[16:50:41] rails-blog-project
♥ rails g controller Posts
      create  app/controllers/posts_controller.rb
      invoke  erb
      create    app/views/posts
      invoke  test_unit
      create    test/controllers/posts_controller_test.rb
      invoke  helper
      create    app/helpers/posts_helper.rb
      invoke    test_unit
      create      test/helpers/posts_helper_test.rb
      invoke  assets
      invoke    coffee
      create      app/assets/javascripts/posts.js.coffee
      invoke    scss
      create      app/assets/stylesheets/posts.css.scss
[16:50:52] rails-blog-project
♥ rails g controller Comments
      create  app/controllers/comments_controller.rb
      invoke  erb
      create    app/views/comments
      invoke  test_unit
      create    test/controllers/comments_controller_test.rb
      invoke  helper
      create    app/helpers/comments_helper.rb
      invoke    test_unit
      create      test/helpers/comments_helper_test.rb
      invoke  assets
      invoke    coffee
      create      app/assets/javascripts/comments.js.coffee
      invoke    scss
      create      app/assets/stylesheets/comments.css.scss
If you return to your directory, you’ll notice that in addition to your application_controller, you now have posts_controller and comments_controller files, both inheriting from ApplicationController:
class CommentsController < ApplicationController
end
class PostsController < ApplicationController
end
If you check your views directory, there should now be subfolders for posts and comments, which will eventually house your views.
Routes
At this point, you have a routes.rb file, but no routes set up. You know this, because if you enter rake routes in the command line, the following output is generated:
[17:00:31] rails-blog-project
♥ rake routes
You don't have any routes defined!

Please add some routes in config/routes.rb.

For more information about routes, see the Rails guide: http://guides.rubyonrails.org/routing.html.
You can add routes by adding the following:
resources :posts do
  resources :comments, :only => [:create]
end
As you can see, the comments routes are nested in the posts routes. It’s common to nest resources which are essentially children of other resources. You used :only to instruct Rails to generate only the specified routes. So, for :comments, you want to be able to create a comment, but the comments will otherwise be viewed only in the routes generated for :posts.
Now, if you enter rake routes, you can see that several routes have been generated:
[19:11:02] rails-blog-project
♥ rake routes
       Prefix Verb   URI Pattern                        Controller#Action
         root GET    /                                  posts#index
post_comments POST   /posts/:post_id/comments(.:format) comments#create
        posts GET    /posts(.:format)                   posts#index
              POST   /posts(.:format)                   posts#create
     new_post GET    /posts/new(.:format)               posts#new
    edit_post GET    /posts/:id/edit(.:format)          posts#edit
         post GET    /posts/:id(.:format)               posts#show
              PATCH  /posts/:id(.:format)               posts#update
              PUT    /posts/:id(.:format)               posts#update
              DELETE /posts/:id(.:format)               posts#destroy
The below graphic helps explain how resources generates routes and what each route is used for:
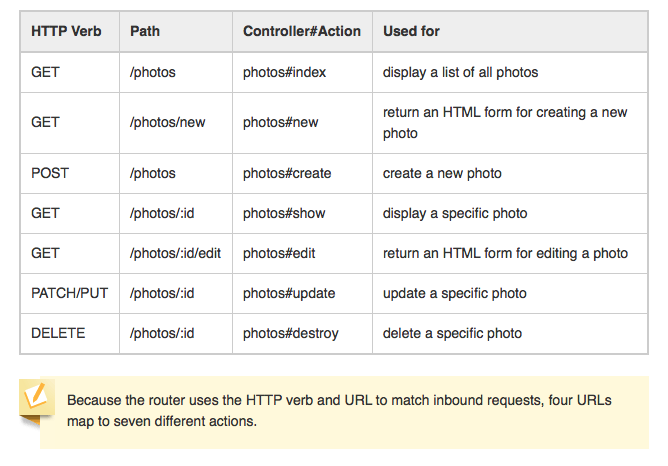
As you can see, you currently have the seven routes listed in the above graphic for posts (eight since PUT and PATCH are listed separately), the root directory and the create route for comments.
As indicated, the above graphic displays four URLs which map to seven actions (or methods which you will include in your posts controller):
1. GET/POST to index.html.erb: (1) index – displays list of posts, (2) create – creates new post which is displayed in list of posts;
2. GET to new.html.erb: (1) new – form for creating new post;
3. GET/PATCH/PUT/DELETE to show.html.erb: (1) show – displays specific post, (2) update – updates specific post, (3) destroy deletes specific post;
4. GET to edit.html.erb: (1) edit – form for editing post.
You’ll notice that edit and update seem familiar; however, one is a POST request and the other is a GET request. To learn more about how resources generates these routes, see the Rails Routing documentation.
The root directory will appear on localhost:3000. To set the root directory to a view other than the default root directory, use root :to => ‘Controller#action’. For your application, you may want to use the posts index page as the root by entering root :to => “posts#index” in routes.rb. However, you could have left the root directory as is and created a separate landing page for your blog with a link to its posts.
At this point, without the commented text, routes.rb should look something like:
Rails.application.routes.draw do

  root :to => "posts#index"

  resources :posts do
    resources :comments, :only => [:create]
  end

end
Views
The purpose of a view is to display information in a human-readable format, such as HTML. To display the information from the controller, Ruby is embedded in the HTML so the application’s information can be rendered by the browser.
Although you’ve created the above routes, if you open the rails server and go to localhost:3000/posts (which is the posts index page), you will get a Rails error letting you know that “The action ‘index’ could not be found…” This is because you have not created the associated views.
To create the index page for posts, add a file called index.html.erb to the posts folder. You can even add some test text to confirm that Rails is loading the correct view. Once you have done this, open localhost:3000/posts. You should see the view you just created.
Since you edited the root directory to be the posts index page, you should see the same content on localhost:3000 as you do on localhost:3000/posts.
There will not be any views generated for comments specifically, as comments will be displayed in the same view as the posts to which they correspond. The form to leave a comment will also be in a posts view.
Controllers, Views and Routes
You now have your controllers and views partially set up. To complete your blog application, you need to be able to add a post or comment in your views which will be stored by the controllers to be generated in other views. Routes serve as the connection between these actions.
There are seven methods that should be included in your posts controller (corresponding to the seven actions described above). The comments above each method describe what the method does and to which view it corresponds:
class PostsController < ApplicationController
  before_action :set_post, only: [:show, :edit, :update, :destroy]

  # GET /posts
  # posts/index.html.erb
  # displays all posts
  def index
    @posts = Post.all
  end

  # GET /posts/1
  # posts/show.html.erb
  # this will show the post
  # will also contain the comment form to create a new comment and show comments
  def show
    @comment = Comment.new
  end

  # GET /posts/new
  # posts/new.html.erb
  # form to create a new post
  def new
    @post = Post.new
  end

  # GET /posts/1/edit
  # edit.html.erb
  # form for editing post
  def edit
  end

  # POST /posts
  # posts/index.html.erb
  # after new post created in form on new.html.erb above,
  # redirects to index page where new post will appear
  def create
    @post = Post.new(post_params)

    if @post.save
      redirect_to @post, notice: 'Post was successfully created.'
    else
      render :new
    end
  end

  # PATCH/PUT /posts/1
  # posts/show.html.erb
  # updates specific post
  def update
    respond_to do |format|
      if @post.update(post_params)
        format.html { redirect_to @post, notice: 'Post was successfully updated.' }
        format.json { render :show, status: :ok, location: @post }
      else
        format.html { render :edit }
        format.json { render json: @post.errors, status: :unprocessable_entity }
      end
    end
  end

  # DELETE /posts/1
  # posts/show.html.erb
  # deletes specific post
  def destroy
    @post.destroy
    respond_to do |format|
      format.html { redirect_to posts_url, notice: 'Post was successfully destroyed.' }
      format.json { head :no_content }
    end
  end

  private
    # Use callbacks to share common setup or constraints between actions.
    def set_post
      @post = Post.find(params[:id])
    end

    # Never trust parameters from the scary internet, only allow the white list through.
    def post_params
      params.require(:post).permit(:title, :content)
    end

end
Although there are no specific views for the comments, you still have to set up the CommentsController:
class CommentsController < ApplicationController

    # creates new comment
    def create
    @post = Post.find(params[:post_id])
    @comment = @post.comments.build(comment_params)

    if @comment.save
      redirect_to @comment.post
    else
      redirect_to :back
    end
    # "comment"=>{"content"=>"Test"}
  end

  private
    def comment_params
      params.require(:comment).permit(:content)
    end

end
Now that you have set up your controllers, you know exactly what each view must contain: (1) posts/index.html.erb will list all posts and contain links to the views for new, show, edit and delete, (2) new.html.erb will include a form for creating new posts, (3) show.html.erb will display a specific post, and will also be the view from which you can update a post, delete a post and create a comment for a post, depending on what link you clicked on to get to the show view, and (4) edit.html.erb will contain a form for editing a post.
To see the views, please review the repository on GitHub. Once the views are set up, you will have a working Rails blog application.
- PM Career Story - April 28, 2022
- How to Transition into Product Management - December 26, 2017
- What I’ve Learned in My First Few Months as a Product Manager - October 14, 2015

Pretty good introduction to Rails!
Thanks so much.
Dag nabbit good stuff you whrpeeisnappprs!
Very nice tutorial about Ruby on Rails
def set_post
@post ||= Post.find(params[:id])
end
is this better?
Shalom Koren, you are really good in summarizing stuff even you are not very professional. I like the way you present technical stuff. You may consider to write a book on how to teach technical stuff to anyone. I keep your site bookmarked. Thanks
Thanks for sharing this useful information. It will really help us a lot.